×
ToyotaParts- Hello
- Login or Register
- Quick Links
- Live Chat
- Track Order
- Parts Availability
- RMA
- Help Center
- Contact Us
- Shop for
- Toyota Parts
- Scion Parts
My Garage
My Account
Cart
OEM 2003 Toyota 4Runner Weather Strip
Door Weatherstripping- Select Vehicle by Model
- Select Vehicle by VIN
Select Vehicle by Model
orMake
Model
Year
Select Vehicle by VIN
For the most accurate results, select vehicle by your VIN (Vehicle Identification Number).
23 Weather Strips found


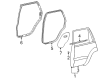
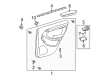
2003 Toyota 4Runner Door Weatherstrip, Driver Side
Part Number: 67872-35080$98.70 MSRP: $138.54You Save: $39.84 (29%)Ships in 1-3 Business DaysProduct Specifications- Other Name: Weatherstrip, Rear Door; Door Seal, Rear Left; Weatherstrip, Rear Door, Driver Side; Weatherstrip; Door Seal
- Position: Driver Side
- Replaces: 67872-35060
- Part Name Code: 67872
- Item Weight: 1.30 Pounds
- Condition: New
- Fitment Type: Direct Replacement
- SKU: 67872-35080
- Warranty: This genuine part is guaranteed by Toyota's factory warranty.


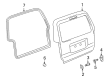
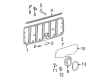
2003 Toyota 4Runner Gate Weatherstrip, Rear
Part Number: 67881-35040$199.67 MSRP: $285.09You Save: $85.42 (30%)Ships in 1-3 Business DaysProduct Specifications- Other Name: Weatherstrip, Back Door; Hatch Seal, Rear; Weatherstrip
- Position: Rear
- Replaces: 67881-35030
- Item Weight: 3.70 Pounds
- Item Dimensions: 29.6 x 23.7 x 4.2 inches
- Condition: New
- SKU: 67881-35040
- Warranty: This genuine part is guaranteed by Toyota's factory warranty.


2003 Toyota 4Runner Belt Weatherstrip, Outer
Part Number: 68290-35031$51.37 MSRP: $71.50You Save: $20.13 (29%)Ships in 1-3 Business DaysProduct Specifications- Other Name: Weatherstrip Assembly, Back Door Glass; Hatch Seal, Rear; Weatherstrip Assembly, Back Door Glass, Outer
- Position: Outer
- Replaces: 68290-35030
- Part Name Code: 68290A
- Item Weight: 1.40 Pounds
- Item Dimensions: 49.4 x 4.2 x 2.1 inches
- Condition: New
- Fitment Type: Direct Replacement
- SKU: 68290-35031
- Warranty: This genuine part is guaranteed by Toyota's factory warranty.


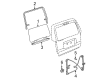
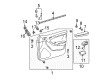
2003 Toyota 4Runner Surround Weatherstrip, Passenger Side
Part Number: 62331-35020-B0$159.91 MSRP: $226.36You Save: $66.45 (30%)Ships in 1-3 Business DaysProduct Specifications- Other Name: Weatherstrip, Rear Door; Door Seal; Weatherstrip, Rear Door Opening Trim, Passenger Side; Weatherstrip
- Position: Passenger Side
- Part Name Code: 62331A
- Item Weight: 2.10 Pounds
- Condition: New
- Fitment Type: Direct Replacement
- SKU: 62331-35020-B0
- Warranty: This genuine part is guaranteed by Toyota's factory warranty.

2003 Toyota 4Runner Surround Weatherstrip, Driver Side
Part Number: 62332-35020-B0$159.91 MSRP: $226.36You Save: $66.45 (30%)Product Specifications- Other Name: Weatherstrip, Rear Door; Door Seal; Weatherstrip, Rear Door Opening Trim, Driver Side; Weatherstrip
- Position: Driver Side
- Part Name Code: 62332A
- Item Weight: 2.40 Pounds
- Item Dimensions: 24.5 x 12.4 x 12.7 inches
- Condition: New
- Fitment Type: Direct Replacement
- SKU: 62332-35020-B0
- Warranty: This genuine part is guaranteed by Toyota's factory warranty.

2003 Toyota 4Runner Surround Weatherstrip, Fawn, Driver Side
Part Number: 62332-35020-E0$154.62 MSRP: $218.88You Save: $64.26 (30%)Ships in 1-3 Business DaysProduct Specifications- Other Name: Weatherstrip, Rear Door; Door Seal; Weatherstrip, Rear Door Opening Trim, Driver Side; Weatherstrip
- Manufacturer Note: FAWN,TRIM4#
- Position: Driver Side
- Part Name Code: 62332A
- Item Weight: 2.40 Pounds
- Condition: New
- Fitment Type: Direct Replacement
- SKU: 62332-35020-E0
- Warranty: This genuine part is guaranteed by Toyota's factory warranty.


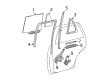
2003 Toyota 4Runner Belt Molding, Outer Passenger Side
Part Number: 68161-35060$39.90 MSRP: $55.53You Save: $15.63 (29%)Ships in 1-3 Business DaysProduct Specifications- Other Name: Weatherstrip, Front Door; Door Window Belt Weatherstrip, Front Right Outer; Weatherstrip Assembly, Front Door Glass, Outer Passenger Side
- Position: Outer Passenger Side
- Part Name Code: 68160C
- Item Weight: 1.10 Pounds
- Item Dimensions: 41.0 x 6.3 x 6.1 inches
- Condition: New
- Fitment Type: Direct Replacement
- SKU: 68161-35060
- Warranty: This genuine part is guaranteed by Toyota's factory warranty.

2003 Toyota 4Runner Belt Molding, Outer Driver Side
Part Number: 68162-35060$39.90 MSRP: $55.53You Save: $15.63 (29%)Ships in 1-3 Business DaysProduct Specifications- Other Name: Weatherstrip, Front Door; Door Window Belt Weatherstrip, Front Left Outer; Weatherstrip Assembly, Front Door Glass, Outer Driver Side
- Position: Outer Driver Side
- Part Name Code: 68210C
- Item Weight: 2.40 Pounds
- Item Dimensions: 75.9 x 3.1 x 3.2 inches
- Condition: New
- Fitment Type: Direct Replacement
- SKU: 68162-35060
- Warranty: This genuine part is guaranteed by Toyota's factory warranty.


2003 Toyota 4Runner Belt Molding, Rear Passenger Side Outer
Part Number: 68163-35030$38.71 MSRP: $53.88You Save: $15.17 (29%)Ships in 1-3 Business DaysProduct Specifications- Other Name: Weatherstrip, Rear Door; Door Window Belt Weatherstrip, Rear Right Outer; Weatherstrip, Rear Door Glass, Outer
- Manufacturer Note: RH
- Position: Rear Passenger Side Outer
- Part Name Code: 68163
- Item Weight: 2.30 Pounds
- Item Dimensions: 50.4 x 6.3 x 6.2 inches
- Condition: New
- Fitment Type: Direct Replacement
- SKU: 68163-35030
- Warranty: This genuine part is guaranteed by Toyota's factory warranty.

2003 Toyota 4Runner Belt Molding, Driver Side Outer
Part Number: 68164-35030$38.71 MSRP: $53.88You Save: $15.17 (29%)Ships in 1-3 Business DaysProduct Specifications- Other Name: Weatherstrip, Rear Door; Door Window Belt Weatherstrip, Rear Left Outer; Weatherstrip, Rear Door Glass, Outer
- Manufacturer Note: LH
- Position: Driver Side Outer
- Part Name Code: 68163
- Item Weight: 1.10 Pounds
- Item Dimensions: 38.3 x 4.7 x 4.6 inches
- Condition: New
- Fitment Type: Direct Replacement
- SKU: 68164-35030
- Warranty: This genuine part is guaranteed by Toyota's factory warranty.


2003 Toyota 4Runner Belt Weatherstrip, Inner Driver Side
Part Number: 68174-35030$43.84 MSRP: $61.03You Save: $17.19 (29%)Ships in 1-3 Business DaysProduct Specifications- Other Name: Weatherstrip, Rear Door; Door Window Belt Weatherstrip, Rear Left; Weatherstrip, Rear Door Glass, Inner Driver Side; Weatherstrip
- Position: Inner Driver Side
- Part Name Code: 68174A
- Item Weight: 0.70 Pounds
- Condition: New
- Fitment Type: Direct Replacement
- SKU: 68174-35030
- Warranty: This genuine part is guaranteed by Toyota's factory warranty.


2003 Toyota 4Runner Belt Weatherstrip, Inner Passenger Side
Part Number: 68171-35130$46.23 MSRP: $64.36You Save: $18.13 (29%)Ships in 1-3 Business DaysProduct Specifications- Other Name: Weatherstrip, Front Door; Door Window Belt Weatherstrip, Front Right; Door Seal; Weatherstrip, Front Door Glass, Inner Passenger Side; Weatherstrip
- Position: Inner Passenger Side
- Part Name Code: 68171B
- Item Weight: 0.60 Pounds
- Condition: New
- Fitment Type: Direct Replacement
- SKU: 68171-35130
- Warranty: This genuine part is guaranteed by Toyota's factory warranty.

2003 Toyota 4Runner Belt Weatherstrip, Inner Driver Side
Part Number: 68172-35030$44.80 MSRP: $62.36You Save: $17.56 (29%)Ships in 1-3 Business DaysProduct Specifications- Other Name: Weatherstrip, Front Door; Door Window Belt Weatherstrip, Front Left; Door Seal; Weatherstrip, Front Door Glass, Inner Driver Side; Weatherstrip
- Position: Inner Driver Side
- Part Name Code: 68172A
- Item Weight: 0.60 Pounds
- Item Dimensions: 39.5 x 5.2 x 5.2 inches
- Condition: New
- Fitment Type: Direct Replacement
- SKU: 68172-35030
- Warranty: This genuine part is guaranteed by Toyota's factory warranty.

2003 Toyota 4Runner Belt Weatherstrip, Inner Passenger Side
Part Number: 68173-35040$46.23 MSRP: $64.36You Save: $18.13 (29%)Ships in 1-3 Business DaysProduct Specifications- Other Name: Weatherstrip, Rear Door; Door Window Belt Weatherstrip, Rear Right; Weatherstrip, Rear Door Glass, Inner Passenger Side; Weatherstrip
- Position: Inner Passenger Side
- Part Name Code: 68173B
- Item Weight: 0.70 Pounds
- Condition: New
- Fitment Type: Direct Replacement
- SKU: 68173-35040
- Warranty: This genuine part is guaranteed by Toyota's factory warranty.
2003 Toyota 4Runner Door Weatherstrip, Passenger Side
Part Number: 67871-35080$98.70 MSRP: $138.54You Save: $39.84 (29%)Ships in 1-3 Business DaysProduct Specifications- Other Name: Weatherstrip, Rear Door; Door Seal, Rear Right; Weatherstrip, Rear Door, Passenger Side; Weatherstrip; Door Seal
- Position: Passenger Side
- Replaces: 67871-35060
- Part Name Code: 67871
- Item Weight: 2.40 Pounds
- Condition: New
- Fitment Type: Direct Replacement
- SKU: 67871-35080
- Warranty: This genuine part is guaranteed by Toyota's factory warranty.

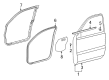
2003 Toyota 4Runner Surround Weatherstrip, Passenger Side
Part Number: 62311-35020-B0$187.90 MSRP: $268.28You Save: $80.38 (30%)Product Specifications- Other Name: Weatherstrip, Front Door; Door Seal; Weatherstrip, Front Door Opening Trim, Passenger Side; Weatherstrip
- Position: Passenger Side
- Part Name Code: 62311C
- Item Weight: 5.20 Pounds
- Item Dimensions: 32.6 x 13.3 x 3.1 inches
- Condition: New
- Fitment Type: Direct Replacement
- SKU: 62311-35020-B0
- Warranty: This genuine part is guaranteed by Toyota's factory warranty.


 Product Specifications
- Other Name: Weatherstrip, Rear Door; Door Seal, Right; Weatherstrip, Rear Door Quarter Window, Passenger Side
- Position: Passenger Side
- Part Name Code: 68188
- Item Weight: 0.70 Pounds
- Condition: New
- Fitment Type: Direct Replacement
- SKU: 68188-35020
- Warranty: This genuine part is guaranteed by Toyota's factory warranty.
 Product Specifications
- Other Name: Weatherstrip, Rear Door; Door Seal; Weatherstrip, Rear Door Opening Trim, Passenger Side; Weatherstrip
- Manufacturer Note: FAWN,TRIM4#
- Position: Passenger Side
- Part Name Code: 62331A
- Item Weight: 2.20 Pounds
- Condition: New
- Fitment Type: Direct Replacement
- SKU: 62331-35020-E0
- Warranty: This genuine part is guaranteed by Toyota's factory warranty.
 Product Specifications
- Other Name: Weatherstrip, Front Door; Door Seal; Weatherstrip, Front Door Opening Trim, Passenger Side; Weatherstrip
- Manufacturer Note: FAWN,TRIM4#
- Position: Passenger Side
- Part Name Code: 62311C
- Item Weight: 5.10 Pounds
- Item Dimensions: 31.3 x 13.7 x 3.1 inches
- Condition: New
- Fitment Type: Direct Replacement
- SKU: 62311-35020-E0
- Warranty: This genuine part is guaranteed by Toyota's factory warranty.


 Product Specifications
- Other Name: Weatherstrip, Back Door; Hatch Seal, Rear Inner; Weatherstrip, Back Door Glass
- Position: Rear Inner
- Part Name Code: 68291
- Item Weight: 1.90 Pounds
- Item Dimensions: 48.3 x 4.2 x 4.2 inches
- Condition: New
- Fitment Type: Direct Replacement
- SKU: 68291-35020
- Warranty: This genuine part is guaranteed by Toyota's factory warranty.
| Page 1 of 2 |Next >
1-20 of 23 Results
2003 Toyota 4Runner Weather Strip
Looking for affordable OEM 2003 Toyota 4Runner Weather Strip? Explore our comprehensive catalogue of genuine 2003 Toyota 4Runner Weather Strip. All our parts are covered by the manufacturer's warranty. Plus, our straightforward return policy and speedy delivery service ensure an unparalleled shopping experience. We look forward to your visit!
2003 Toyota 4Runner Weather Strip Parts Q&A
- Q: How to replace the rear door window glass Weather Strip on 2003 Toyota 4Runner?A: Starting to replace the rear door window glass Weather Strip requires disassembly of the power window regulator switch assembly rear, rear door inside handle bezel LH, and then the rear armrest assembly LH, the rear door trim board sub-assembly LH, and finally the rear door window frame moulding front LH. First remove the outer rear door glass Weather Strip by taking out its single screw before taping the Weather Strip area. First tape the screwdriver tip and then use the screwdriver or moulding remover to disengage the claw while removing the glass Weather Strip. During installation the personnel will follow the exact reverse sequence of disassembly steps that were used before while keeping identical procedures between the LH and RH sides.
Related 2003 Toyota 4Runner Parts
 2003 Toyota 4Runner Wiper Blade
 2003 Toyota 4Runner Seat Heater Switch
 2003 Toyota 4Runner Windshield Washer Nozzle
 2003 Toyota 4Runner Door Hinge
 2003 Toyota 4Runner Door Lock Cylinder
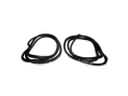 2003 Toyota 4Runner Door Seal
 2003 Toyota 4Runner Instrument Panel Light Bulb
 2003 Toyota 4Runner Lift Support
 2003 Toyota 4Runner Liftgate Hinge
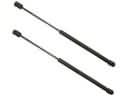 2003 Toyota 4Runner Liftgate Lift Support
 2003 Toyota 4Runner Window Motor
 2003 Toyota 4Runner Window Run