×
ToyotaParts- Hello
- Login or Register
- Quick Links
- Live Chat
- Track Order
- Parts Availability
- RMA
- Help Center
- Contact Us
- Shop for
- Toyota Parts
- Scion Parts
My Garage
My Account
Cart
Blower Motor & Fan
2006 Scion xA Cabin Air Filter, Blower Motor, Blend Door Actuator
Currently shopping for
2006 Scion xA
Change VehicleVehicle Options
Base; 4 Cyl 1.5 L GASVehicle Options
Base; 4 Cyl 1.5 L GASCategories Close X
Currently selected
A/C & Heating
Other Categories
Air & Fuel Delivery
Belts & Cooling
Body & Hardware
Brakes
Charging & Starting
Driveline & Axles
Electrical
Emission Control & Exhaust
Engine
Headlights & Lighting
Interior & Exterior Trim
Maintenance & Lubrication
Steering
Suspension
Transmission

Categories Close X
How to use OE catalog
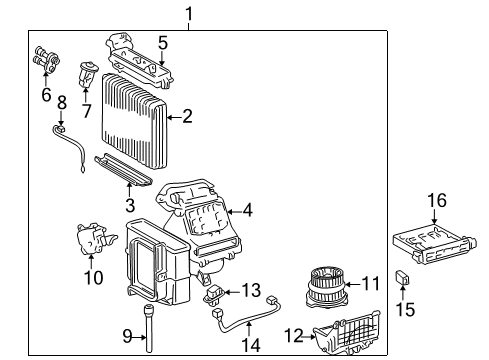
Diagram (1 of 1): Air conditioner & heater - Evaporator components
Sort by:
Ref No.
Ref No.
Part No. & Part Description
Price & Qty.
Part No. &
Part Description
Part Description
- 2
 MSRP: $414.33 Your Price: $290.191
- 6
 MSRP: $90.47 Your Price: $64.451
- 7
 MSRP: $120.42 Your Price: $85.781
- 8
 MSRP: $26.60 Your Price: $19.11
- 10


- 12

- 13


 MSRP: $38.24 Your Price: $27.471
- 15

 MSRP: $662.33 Your Price: $451.951
- 16

 MSRP: $31.35 Your Price: $24.611


 MSRP: $95.46 Your Price: $68.011

 MSRP: $2.98 Your Price: $2.14
 87030-52261
Blower Assy, Air Conditioner- Production Date: from 07/2005
- Fitting Vehicle Options: NCP61
- Part Name Code: 87030
MSRP: $3053.10 Your Price: $2083.29
")
") MSRP: $7.47 Your Price: $5.37
MSRP: $7.47 Your Price: $5.37
 MSRP: $2.64 Your Price: $1.90

 MSRP: $3.81 Your Price: $2.74
")
") MSRP: $6.30 Your Price: $4.53
MSRP: $6.30 Your Price: $4.53
")
") MSRP: $6.80 Your Price: $4.89
MSRP: $6.80 Your Price: $4.89
OEM 2006 Scion xA Parts for Blower Motor & Fan
Genuine 2006 Scion xA parts are produced by Scion with the official design and standards, thus they ensure a high quality throughout the production process. OEM parts are the ideal choice for people looking for new Blower Motor & Fan parts. With our competitive prices, we offer 2006 Scion xA Cabin Air Filter, Blower Motor, Blend Door Actuator that fit tight budgets, while still including the manufacturer warranties, a hassle-free returns policy and quick shipping options.
Blend Door Actuator, Blower Motor Installation and Repair Tips for 2006 Scion xA
- Q: How to service and repair the Blend Door Actuator / Motor on 2006 Scion xA?A: To service the Air Door Actuator/Motor, remove the instrument panel sub-assembly and lower instrument panel assembly. Disconnect the connector and remove 3 screws to take out the damper servo. Reinstall by securing the damper servo, reconnecting the connector, and reassembling the instrument panel components.
- Q: How to service and repair the blower motor on 2006 Scion xA?A: To service blower motor, detach ECM cover and ECM and remove connector and unscrew blower with fan motor sub-assembly. To install, screw the blower into place with the 3 screws, reattach the connector and replace the ECM and cover.