×
ToyotaParts- Hello
- Login or Register
- Quick Links
- Live Chat
- Track Order
- Parts Availability
- RMA
- Help Center
- Contact Us
- Shop for
- Toyota Parts
- Scion Parts
My Garage
My Account
Cart
Interior Trim - Rear Door
2004 Scion xA Armrest, Weather Strip
Currently shopping for
2004 Scion xA
Change VehicleVehicle Options
Base; 4 Cyl 1.5 L GASVehicle Options
Base; 4 Cyl 1.5 L GASCategories Close X
Currently selected
Interior & Exterior Trim
- Exterior Trim - Fender
- Exterior Trim - Front Door
- Exterior Trim - Lift Gate
- Exterior Trim - Pillars
- Exterior Trim - Quarter Panel
- Exterior Trim - Rear Door
- Exterior Trim - Roof
- Interior Trim - Front Door
- Interior Trim - Lift Gate
- Interior Trim - Pillars
- Interior Trim - Quarter Panels
- Interior Trim - Rear Body
- Interior Trim - Rear Door
- Interior Trim - Roof
Other Categories
A/C & Heating
Air & Fuel Delivery
Belts & Cooling
Body & Hardware
Brakes
Charging & Starting
Driveline & Axles
Electrical
Emission Control & Exhaust
Engine
Headlights & Lighting
Maintenance & Lubrication
Steering
Suspension
Transmission


How to use OE catalog
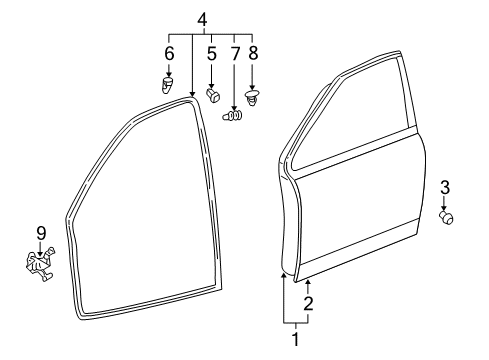
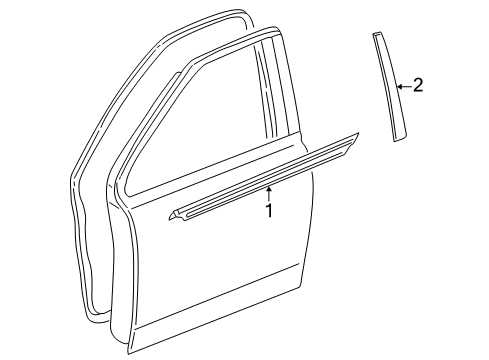
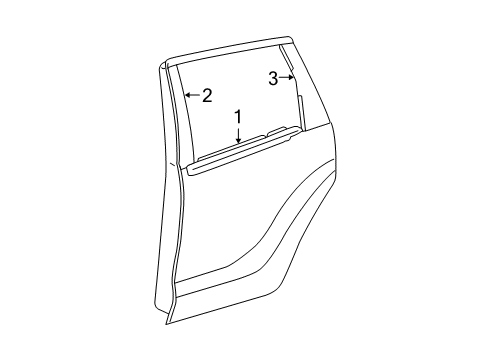
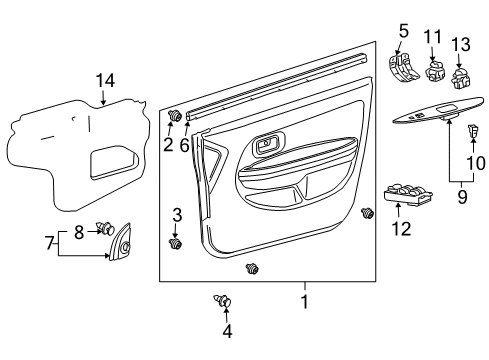
Diagram (1 of 1): Rear door - Interior trim
Sort by:
Ref No.
Ref No.
Part No. & Part Description
Price & Qty.
Part No. &
Part Description
Part Description
- 1

- 1MSRP: $450.09 Your Price: $315.241
- 2


 MSRP: $2.15 Your Price: $1.5410
- 3

 MSRP: $3.64 Your Price: $2.621
 - 367771-32120
Door Trim Panel RetainerRetainer, Door Trim Panel- Part Notes: No.2
- Location: Passenger Side
MSRP: $5.31 Your Price: $3.811
- 4


 MSRP: $2.31 Your Price: $1.6610
- 5
 MSRP: $18.04 Your Price: $12.971
- 6
 MSRP: $47.06 Your Price: $33.811
 - 6MSRP: $45.56 Your Price: $32.731
- 7
 MSRP: $59.10 Your Price: $42.461
 - 7MSRP: $64.10 Your Price: $46.061
- 8
 MSRP: $50.14 Your Price: $36.021
 - 8
- 9

 MSRP: $1.81 Your Price: $1.3010
- 10

 MSRP: $91.47 Your Price: $65.161
- 11
 MSRP: $28.09 Your Price: $20.18
")
") MSRP: $3.64 Your Price: $2.62
MSRP: $3.64 Your Price: $2.62


 MSRP: $2.31 Your Price: $1.66

 MSRP: $2.31 Your Price: $1.66

 MSRP: $2.31 Your Price: $1.66
 MSRP: $1.81 Your Price: $1.30
 67216-52080
Stopper, Rear Door Glass, Upper NO.2- Production Date: 10/2003-07/2005
- Fitting Vehicle Options: NCP61
- Part Name Code: 67216E
MSRP: $6.90 Your Price: $4.96

 MSRP: $3.14 Your Price: $2.26
 MSRP: $1.81 Your Price: $1.30

 MSRP: $1.65 Your Price: $1.18
OEM 2004 Scion xA Parts for Interior Trim - Rear Door
Genuine 2004 Scion xA parts are produced by Scion with the official design and standards, thus they ensure a high quality throughout the production process. OEM parts are the ideal choice for people looking for new Interior Trim - Rear Door parts. With our competitive prices, we offer 2004 Scion xA Armrest, Weather Strip that fit tight budgets, while still including the manufacturer warranties, a hassle-free returns policy and quick shipping options.
Weather Strip Installation and Repair Tips for 2004 Scion xA
- Q: How to replace the rear door glass weather strip assy outer LH on 2004 Scion xA?A: To replace the rear door glass weather strip assy outer lh, remove the rear door rear guide bracket garnish lh, power window regulator switch assy rear, and rear door trim board sub-assy lh. Use protective tape and a moulding remover to pry out the weather strip carefully.