×
ToyotaParts- Hello
- Login or Register
- Quick Links
- Live Chat
- Track Order
- Parts Availability
- RMA
- Help Center
- Contact Us
- Shop for
- Toyota Parts
- Scion Parts
My Garage
My Account
Cart
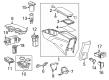
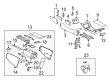
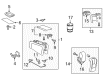
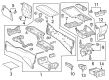
OEM Toyota Prius Center Console Base
- Select Vehicle by Model
- Select Vehicle by VIN
Select Vehicle by Model
orMake
Model
Year
Select Vehicle by VIN
For the most accurate results, select vehicle by your VIN (Vehicle Identification Number).
37 Center Console Bases found


Toyota Prius Console Base, Black, Rear Part Number: 58910-47020-C3
$418.80 MSRP: $613.77You Save: $194.97 (32%)Ships in 1-3 Business Days


Toyota Prius Side Trim, Gray, Driver Side Part Number: 58812-47010-B0
$59.95 MSRP: $84.15You Save: $24.20 (29%)Ships in 1-3 Business Days
Toyota Prius Console Body, Rear Part Number: 58901-47060-E1
$368.57 MSRP: $540.14You Save: $171.57 (32%)Ships in 1-3 Business DaysToyota Prius Console Base, Black, Rear Part Number: 58910-47180-C0
$403.94 MSRP: $591.98You Save: $188.04 (32%)Ships in 1-3 Business DaysToyota Prius Console Body, Rear Part Number: 58901-47030-E0
$404.85 MSRP: $593.32You Save: $188.47 (32%)Ships in 1-3 Business DaysToyota Prius Console Base, Black, Rear Part Number: 58910-47170-C0
$409.95 MSRP: $600.79You Save: $190.84 (32%)Ships in 1-3 Business DaysToyota Prius Console Body, Gray, Rear Part Number: 58901-47030-B1
$414.38 MSRP: $607.27You Save: $192.89 (32%)Ships in 1-3 Business DaysToyota Prius Console Base, Gray, Rear Part Number: 58910-47020-B2
$418.75 MSRP: $613.68You Save: $194.93 (32%)Ships in 1-3 Business DaysToyota Prius Console Base, Black, Rear Part Number: 58910-47010-C2
$426.18 MSRP: $624.58You Save: $198.40 (32%)Ships in 1-3 Business DaysToyota Prius Console Base, Gray, Rear Part Number: 58910-47010-B1
$433.10 MSRP: $634.73You Save: $201.63 (32%)Ships in 1-3 Business DaysToyota Prius Console Body, Rear Part Number: 58901-47040-E0
$433.10 MSRP: $634.73You Save: $201.63 (32%)Ships in 1-3 Business Days
Toyota Prius Console Base, Black, Rear Part Number: 58910-47240-C1
$433.67 MSRP: $635.56You Save: $201.89 (32%)Ships in 1-2 Business Days
Toyota Prius Rear Console, Gray Part Number: 58901-47110-B3
$463.75 MSRP: $679.63You Save: $215.88 (32%)Ships in 1-3 Business DaysToyota Prius Rear Console Part Number: 58901-47090-E2
$484.63 MSRP: $710.23You Save: $225.60 (32%)Ships in 1-3 Business DaysToyota Prius Rear Console Part Number: 58901-47110-E1
$485.02 MSRP: $710.81You Save: $225.79 (32%)Ships in 1-3 Business DaysToyota Prius Rear Console, Light Gray Part Number: 58901-47191-G2
$542.01 MSRP: $794.31You Save: $252.30 (32%)Ships in 1-3 Business DaysToyota Prius Rear Console Part Number: 58901-47191-E0
$542.01 MSRP: $794.31You Save: $252.30 (32%)Ships in 1-3 Business DaysToyota Prius Rear Console, Black/Gray Part Number: 58901-47191-B3
$542.06 MSRP: $794.41You Save: $252.35 (32%)Ships in 1-3 Business DaysToyota Prius Rear Console Part Number: 58901-47200-E1
$562.78 MSRP: $824.76You Save: $261.98 (32%)Ships in 1-3 Business DaysToyota Prius Rear Console, Light Gray Part Number: 58901-47200-G1
$564.28 MSRP: $826.95You Save: $262.67 (32%)Ships in 1-3 Business Days
| Page 1 of 2 |Next >
1-20 of 37 Results
Toyota Prius Center Console Base
Choose genuine Center Console Base that pass strict quality control tests. You can trust the top quality and lasting durability. Shopping for OEM Center Console Base for your Toyota Prius? Our website is your one-stop destination. We stock an extensive selection of genuine Toyota Prius parts. The price is affordable so you can save more. It only takes minutes to browse and find the exact fit. Easily add to cart and check out fast. Our hassle-free return policy will keep you stress-free. We process orders quickly for swift delivery. Your parts will arrive faster, so you can get back on the road sooner.
Toyota Prius Center Console Base Parts and Q&A
- Q: How to remove the rear Center Console Base on Toyota Prius?A:The process for removing the rear console box requires beginning with extracting the upper console panel sub-assembly by elevating it to break free its 2 claws before separating 4 clips for console panel removal with instrument panel cup holder and 4 screws. Then detach both the console box pocket and console box carpet. You must pull up the console rear end panel sub-assembly according to the specified direction to untangle its 4 claws and 2 clips before removing it with all attaching 4 screws and the rear console box cup holder. Disconnect the rear console box sub-assembly through removal of its 2 screws, 2 bolts, and console box component.
- Q: How to install the rear Center Console Base sub-assembly and upper console panel sub-assembly on Toyota Prius?A:Begin installation of the rear console box sub-assembly by fastening it with two screws and two bolts. Fitting the rear console box cup holder requires 4 screws after which you can fasten the console rear end panel with 4 claws and 2 clips. Attach the console box carpet followed by installation of the console box pocket. The installation of the upper console panel sub-assembly requires the instrument panel cup holder to be secured through 4 screws then requires attachment of 4 clips and 2 claws to complete the assembly.

Related Toyota Prius Parts
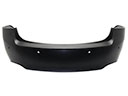 Toyota Prius Bumper Cover
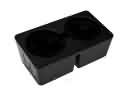 Toyota Prius Cup Holder
 Toyota Prius Instrument Cluster
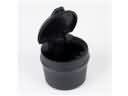 Toyota Prius Ashtray
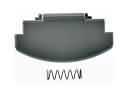 Toyota Prius Center Console Latch
 Toyota Prius Door Seal
 Toyota Prius Glove Box
 Toyota Prius Grille
 Toyota Prius Hood Hinge
 Toyota Prius Seat Heater Switch
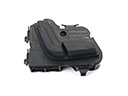 Toyota Prius Seat Switch
 Toyota Prius Side Marker Light