×
ToyotaParts- Hello
- Login or Register
- Quick Links
- Live Chat
- Track Order
- Parts Availability
- RMA
- Help Center
- Contact Us
- Shop for
- Toyota Parts
- Scion Parts
My Garage
My Account
Cart
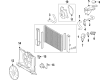
OEM Scion iM Radiator fan
Radiator Cooling Fan- Select Vehicle by Model
- Select Vehicle by VIN
Select Vehicle by Model
orMake
Model
Year
Select Vehicle by VIN
For the most accurate results, select vehicle by your VIN (Vehicle Identification Number).
1 Radiator fan found

Scion iM Fan Blade Part Number: 16361-22100
$64.57 MSRP: $90.64You Save: $26.07 (29%)Ships in 1 Business Day
Scion iM Radiator fan
Choose genuine Radiator fan that pass strict quality control tests. You can trust the top quality and lasting durability. Shopping for OEM Radiator fan for your Scion iM? Our website is your one-stop destination. We stock an extensive selection of genuine Scion iM parts. The price is affordable so you can save more. It only takes minutes to browse and find the exact fit. Easily add to cart and check out fast. Our hassle-free return policy will keep you stress-free. We process orders quickly for swift delivery. Your parts will arrive faster, so you can get back on the road sooner.
Scion iM Radiator Fan is located behind the slender grille at the back of the hatchback, yet one should initially understand the reasons why the owners adore the vehicle itself. The Scion iM matches a vigorous 1.8 liter four cylinder engine with an abrupt six speed manual, or smooth CVT, to provide drivers with efficient performance and 137 horsepower. Multi link rear suspension, 17 inch alloy wheels and quick steering allow the Scion to navigate through the city traffic and at the same time absorb bumps during weekend outings. The iM has a 7 inch touchscreen, Bluetooth streaming, and supportive seats inside, which makes it a comfortable and connected daily companion, and every part of Scion is engineered to last long and has a reassuring feel. Balancing these strong points, the iM Radiator Fan will make the engine stay cool. This is an electrically powered Radiator Fan, which pulls air over the radiator when the road speed is not sufficient, through a shaped blade and a small motor in a shroud that forces the air to flow uniformly. The Radiator Fan maintains coolant temperature constant, preventing power output, fuel economy, and gasket integrity at summer gridlock or parking lot idle. Routine maintenance rarely bothers the owners since the assembly is made of tough factory plastics, sealed motor that is not prone to moisture, and balanced blades to run silently. Installation, parking, disconnecting of the battery, letting the engine cool, unbolting and unplugging the old fan, fitting the new one, power reconnection, and testing.
Related Scion iM Parts
 Scion iM Coolant Reservoir
 Scion iM Cooling Fan Assembly
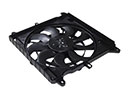 Scion iM Cooling Fan Module
 Scion iM Fan Blade
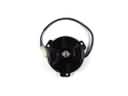 Scion iM Fan Motor
 Scion iM Radiator
 Scion iM Radiator Cap
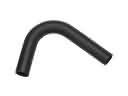 Scion iM Radiator Hose
 Scion iM Thermostat
 Scion iM Thermostat Housing
 Scion iM Water Pump
 Scion iM Water Pump Gasket