×
ToyotaParts- Hello
- Login or Register
- Quick Links
- Live Chat
- Track Order
- Parts Availability
- RMA
- Help Center
- Contact Us
- Shop for
- Toyota Parts
- Scion Parts
My Garage
My Account
Cart
OEM 2006 Toyota RAV4 A/C Switch
Air Conditioning Switch- Select Vehicle by Model
- Select Vehicle by VIN
Select Vehicle by Model
orMake
Model
Year
Select Vehicle by VIN
For the most accurate results, select vehicle by your VIN (Vehicle Identification Number).
3 A/C Switches found


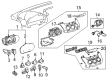
2006 Toyota RAV4 Temperature Control
Part Number: 55903-0R010$43.37 MSRP: $60.37You Save: $17.00 (29%)Ships in 1-2 Business DaysProduct Specifications- Other Name: Control Sub-Assembly, Heater; HVAC Mode Control Switch; Climate Control Module; Blower Control Switch; Dash Control Unit
- Replaces: 55903-42050
- Part Name Code: 55903A
- Item Weight: 0.60 Pounds
- Item Dimensions: 11.9 x 6.9 x 4.2 inches
- Condition: New
- Fitment Type: Direct Replacement
- SKU: 55903-0R010
- Warranty: This genuine part is guaranteed by Toyota's factory warranty.

2006 Toyota RAV4 Temperature Control
Part Number: 55902-0R010$79.86 MSRP: $112.09You Save: $32.23 (29%)Ships in 1 Business DayProduct Specifications- Other Name: Control Sub-Assembly, Heater; HVAC Mode Switch; Climate Module; Blower Switch; Motor Resistor; Blower Motor Switch
- Replaces: 55902-42040
- Part Name Code: 55902B
- Item Weight: 0.60 Pounds
- Item Dimensions: 8.2 x 5.1 x 3.0 inches
- Condition: New
- Fitment Type: Direct Replacement
- SKU: 55902-0R010
- Warranty: This genuine part is guaranteed by Toyota's factory warranty.
 Product Specifications
- Other Name: Control Assembly, Air Conditioner; HVAC Temperature Control Panel; Climate Control Module; Blower Control Switch; Dash Control Unit
- Manufacturer Note: GRAY,TRIM1#,4#,MARK=55900-42260
- Replaces: 55900-42260
- Part Name Code: 55900
- Item Weight: 1.50 Pounds
- Item Dimensions: 13.6 x 7.3 x 3.9 inches
- Condition: New
- Fitment Type: Direct Replacement
- SKU: 55900-42260-B0
- Warranty: This genuine part is guaranteed by Toyota's factory warranty.
2006 Toyota RAV4 A/C Switch
Looking for affordable OEM 2006 Toyota RAV4 A/C Switch? Explore our comprehensive catalogue of genuine 2006 Toyota RAV4 A/C Switch. All our parts are covered by the manufacturer's warranty. Plus, our straightforward return policy and speedy delivery service ensure an unparalleled shopping experience. We look forward to your visit!
2006 Toyota RAV4 A/C Switch Parts Q&A
- Q: How to service and repair the A/C Switch Assembly for a manual air conditioning system on 2006 Toyota RAV4?A: Disconnection of the negative battery terminal cable for 90 seconds or more is necessary to avoid Air Bag and seat belt pretensioner activation before performing manual air conditioning service or repair on the Air Conditioning Control Assembly. Begin by removing the center finish panel in No. 2 instrument cluster position then proceed to take out No. 1 instrument cluster center panel and finally detach the radio receiver assembly. The air conditioning control assembly removal starts with removing two screws and utilizing a screwdriver to detach three clips after taping the screwdriver tip. Follow the order to pull out the air conditioning control by disconnecting its connectors. The air mix control switch must be removed by disconnecting its 2 claws before proceeding to remove the blower control switch and the air vent mode control switch which need 2 claws removal also. First attach the 2 claws to the air vent mode control switch and then install the blower control switch and air mix control switch by using the same procedure. Connect all connectors to the air conditioning control assembly then secure it with three clips while using two screws for assembly attachment. After reinstalling the radio receiver assembly continue by putting back the No. 1 instrument cluster finish panel center and the No. 2 instrument cluster finish panel center. Complete the process by connecting the cable to the negative battery terminal then verify the operational status of the SRS warning light.
Related 2006 Toyota RAV4 Parts
 2006 Toyota RAV4 Armrest
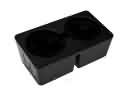 2006 Toyota RAV4 Cup Holder
 2006 Toyota RAV4 Instrument Cluster
 2006 Toyota RAV4 Liftgate Hinge
 2006 Toyota RAV4 Car Mirror
 2006 Toyota RAV4 Door Lock Cylinder
 2006 Toyota RAV4 Lift Support
 2006 Toyota RAV4 Seat Heater
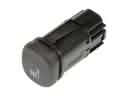 2006 Toyota RAV4 Seat Heater Switch
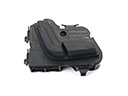 2006 Toyota RAV4 Seat Switch
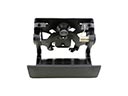 2006 Toyota RAV4 Tailgate Handle
 2006 Toyota RAV4 Weather Strip