×
ToyotaParts- Hello
- Login or Register
- Quick Links
- Live Chat
- Track Order
- Parts Availability
- RMA
- Help Center
- Contact Us
- Shop for
- Toyota Parts
- Scion Parts
My Garage
My Account
Cart
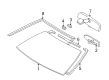
OEM 2005 Toyota Celica Windshield
Glass Windshield- Select Vehicle by Model
- Select Vehicle by VIN
Select Vehicle by Model
orMake
Model
Year
Select Vehicle by VIN
For the most accurate results, select vehicle by your VIN (Vehicle Identification Number).
1 Windshield found

 Product Specifications
- Other Name: Glass Sub-Assembly, Windshield; Windshield Glass, Front; Glass, Windshield
- Manufacturer Note: *TL,T=4.76
- Position: Front
- Part Name Code: 56111
- Condition: New
- Fitment Type: Direct Replacement
- SKU: 56101-20070
- Warranty: This genuine part is guaranteed by Toyota's factory warranty.
2005 Toyota Celica Windshield
Looking for affordable OEM 2005 Toyota Celica Windshield? Explore our comprehensive catalogue of genuine 2005 Toyota Celica Windshield. All our parts are covered by the manufacturer's warranty. Plus, our straightforward return policy and speedy delivery service ensure an unparalleled shopping experience. We look forward to your visit!
2005 Toyota Celica Windshield Parts Q&A
- Q: How to remove and install a windshield on 2005 Toyota Celica?A: Start by removing front pillar garnish using a screwdriver which should have tape wrapped around the tip to protect it. Perform this task again for the opposite side. Follow the same procedure for the second side. The maintenance requires map light assembly removal from all vehicles through lens removal and two screw decoupling and connector disconnection. When replacing the windshield on vehicles with sliding roofs the procedure includes screw removal and using a moulding remover to separate the cover followed by unscrewing the map light assembly before disconnecting the connector. The procedure demands removal of sun visors combined with sun visor holders and the inner rear view mirror according to the displayed illustration. The wiper arm head caps and nuts require removal in addition to wiper arm extraction. The removal of cowl top seal and ventilator louver on the hood requires four screws to be taken off along with six clips and after this step the washer hoses need to be disconnected. To access the front part of vehicle roofs with sliding facilities consumers should remove the sliding element followed by lowering the headlining section. A knife will be used to slice through the outside windshield moulding while cautioning against wrecking the body structure before removing additional moulding pieces. Installing piano wire between the body and glass will allow the removal of windshield glass if you secure the ends with wooden blocks. To perform this task you should disconnect any existing connectors before using the piano wire to cut adhesive away while making sure the paint surface and exterior decoration stays intact. A plastic sheet must be added between the piano wire and safety pad to stop damage to finish while a person removes the glass by keeping substantial adhesive on the body. To install the parts begin by using a knife to make contact surface cuts on the body while keeping the adhesive intact and wipe the cutting area with a shop rag containing cleaner. After glass removal proceed to clean the items by first eliminating defective No.2 stoppers and dams and then scrap off adhesive using a cleaner while avoiding direct contact with the glass face during the cleaning stage. The process to replace no.1 stoppers includes repairing damaged parts first before cutting away the old glue and cleaning the area so new stoppers can be applied according to notched orientation. Add new No.2 stoppers to the glass structure by positioning them according to the ceramic notches. New dams should be installed utilizing double stick tape. Position the glass with attention to an equal rim contact before placing reference marks followed by glass removal. Clean the black surface area of the glass rim without allowing contact to reach the glass face. Before application of Primer "M" cover only the visible parts of the body but avoid applying the substance to adhesive areas. Allow the Primer "M" layer to dry for at least three minutes. Primer "G" should be applied to the glass edges then the residual liquid wiped off before drying for at least three minutes. Use cartridge Part No. 08850-00801 or equivalent of adhesive material promptly according to the specified time period. Seam the windshield glass by matching its position according to reference marks through suction rubber application and applying a gentle press for proper contact. First normalize all adhesive with a spatula before adding the new windshield moulding and cleaning off extra adhesive while the glue remains soft. Place protective tape around the glass and moulding until the adhesive achieves full hardness then continue without operation of the vehicle. Perform a leakage check before putting back the full roof headliner together with cowl top ventilator louver and the hood to cowl top seal while also installing wiper arms and the inner rear view mirror and sun visor holders as well as sun visors and map light assembly and front pillar garnish in that order.
Related 2005 Toyota Celica Parts
 2005 Toyota Celica Emblem
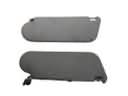 2005 Toyota Celica Sun Visor
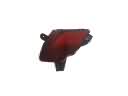 2005 Toyota Celica Bumper Reflector
 2005 Toyota Celica Car Mirror
 2005 Toyota Celica Grille
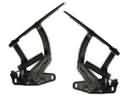 2005 Toyota Celica Hood Hinge
 2005 Toyota Celica Tailgate Handle
 2005 Toyota Celica Washer Pump
 2005 Toyota Celica Washer Reservoir
 2005 Toyota Celica Windshield Wiper
 2005 Toyota Celica Wiper Arm
 2005 Toyota Celica Wiper Motor