×
ToyotaParts- Hello
- Login or Register
- Quick Links
- Live Chat
- Track Order
- Parts Availability
- RMA
- Help Center
- Contact Us
- Shop for
- Toyota Parts
- Scion Parts
My Garage
My Account
Cart
OEM 2005 Toyota Celica Seat Belt
Seat Safety Belt- Select Vehicle by Model
- Select Vehicle by VIN
Select Vehicle by Model
orMake
Model
Year
Select Vehicle by VIN
For the most accurate results, select vehicle by your VIN (Vehicle Identification Number).
7 Seat Belts found


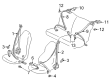
2005 Toyota Celica Buckle, Black, Driver Side
Part Number: 73230-20761-C0$43.25 MSRP: $60.20You Save: $16.95 (29%)Ships in 1-3 Business DaysProduct Specifications- Other Name: Belt Assembly, Front Seat; Seat Belt Receptacle, Front Left; Latch; Belt Assembly, Front Seat Inner, Driver Side
- Position: Driver Side
- Replaces: 73230-20761-B0
- Part Name Code: 73240
- Item Weight: 1.10 Pounds
- Condition: New
- Fitment Type: Direct Replacement
- SKU: 73230-20761-C0
- Warranty: This genuine part is guaranteed by Toyota's factory warranty.

2005 Toyota Celica Buckle, Black, Rear Inner
Part Number: 73380-20511-C1$33.10 MSRP: $46.07You Save: $12.97 (29%)Ships in 1-3 Business DaysProduct Specifications- Other Name: Belt Assembly, Rear Seat, Inner; Seat Belt Receptacle, Rear; Latch; Rear Seat 3 Point Belt Assembly, Inner, Passenger & Driver Side
- Position: Rear Inner
- Item Weight: 1.10 Pounds
- Condition: New
- Fitment Type: Direct Replacement
- SKU: 73380-20511-C1
- Warranty: This genuine part is guaranteed by Toyota's factory warranty.

2005 Toyota Celica Lap & Shoulder Belt, Black, Rear Outer Passenger Side
Part Number: 73360-20821-C1$163.33 MSRP: $231.21You Save: $67.88 (30%)Ships in 1-3 Business DaysProduct Specifications- Other Name: Belt Assembly, Rear Seat, Outer Right; Seat Belt Lap and Shoulder Belt, Rear Left, Rear Right; Retractor Assembly; Rear Seat 3 Point Type Belt Assemblies for Outer Passenger and Driver Side.
- Position: Rear Outer Passenger Side
- Item Weight: 3.30 Pounds
- Item Dimensions: 12.0 x 10.8 x 8.1 inches
- Condition: New
- Fitment Type: Direct Replacement
- SKU: 73360-20821-C1
- Warranty: This genuine part is guaranteed by Toyota's factory warranty.

2005 Toyota Celica Lap & Shoulder Belt, Black, Passenger Side
Part Number: 73210-2B161-C3$275.21 MSRP: $392.94You Save: $117.73 (30%)Ships in 1-3 Business DaysProduct Specifications- Other Name: Belt Assembly, Front Seat; Seat Belt Lap and Shoulder Belt, Front Right; Retractor Assembly; Belt Assembly, Front Seat Outer, Passenger Side
- Position: Passenger Side
- Part Name Code: 73210
- Item Weight: 4.40 Pounds
- Condition: New
- Fitment Type: Direct Replacement
- SKU: 73210-2B161-C3
- Warranty: This genuine part is guaranteed by Toyota's factory warranty.

2005 Toyota Celica Lap & Shoulder Belt, Black, Driver Side
Part Number: 73220-20831-C3$263.51 MSRP: $376.24You Save: $112.73 (30%)Ships in 1-3 Business DaysProduct Specifications- Other Name: Belt Assembly, Front Seat; Seat Belt Lap and Shoulder Belt, Front Left; Retractor Assembly; Belt Assembly, Front Seat Outer, Driver Side
- Position: Driver Side
- Part Name Code: 73220
- Item Weight: 4.40 Pounds
- Condition: New
- Fitment Type: Direct Replacement
- SKU: 73220-20831-C3
- Warranty: This genuine part is guaranteed by Toyota's factory warranty.
 Product Specifications
- Other Name: Belt Assembly, Front Seat; Seat Belt Receptacle, Front Right; Latch; Belt Assembly, Front Seat Inner, Passenger Side
- Position: Passenger Side
- Part Name Code: 73230
- Item Weight: 1.50 Pounds
- Item Dimensions: 13.9 x 11.1 x 2.3 inches
- Condition: New
- Fitment Type: Direct Replacement
- SKU: 73230-20771-B0
- Warranty: This genuine part is guaranteed by Toyota's factory warranty.
2005 Toyota Celica Buckle, Black, Passenger Side
Part Number: 73230-20771-C0$43.37 MSRP: $60.37You Save: $17.00 (29%)Product Specifications- Other Name: Belt Assembly, Front Seat; Seat Belt Receptacle, Front Right; Latch; Belt Assembly, Front Seat Inner, Passenger Side
- Position: Passenger Side
- Part Name Code: 73230
- Item Weight: 1.50 Pounds
- Item Dimensions: 13.5 x 11.6 x 2.2 inches
- Condition: New
- Fitment Type: Direct Replacement
- SKU: 73230-20771-C0
- Warranty: This genuine part is guaranteed by Toyota's factory warranty.
2005 Toyota Celica Seat Belt
Looking for affordable OEM 2005 Toyota Celica Seat Belt? Explore our comprehensive catalogue of genuine 2005 Toyota Celica Seat Belt. All our parts are covered by the manufacturer's warranty. Plus, our straightforward return policy and speedy delivery service ensure an unparalleled shopping experience. We look forward to your visit!
2005 Toyota Celica Seat Belt Parts Q&A
- Q: What is the correct method for installing a new seat belt tongue plate stopper and inspecting the seat belt webbing for damage on 2005 Toyota Celica?A: There has also been introduction of a new service part, which is the seat belt tongue plate stopper, with installation procedures. Move the tongue plate, take out the original stopper, and check the webbing to see whether it is damaged. Attach the new stopper in place, with an adjustable wrench and be sure the male pin is firmly seated.
Related 2005 Toyota Celica Parts
 2005 Toyota Celica Oxygen Sensor
 2005 Toyota Celica Speedometer
 2005 Toyota Celica Air Bag
 2005 Toyota Celica Back Up Light Switch
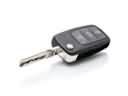 2005 Toyota Celica Car Key
 2005 Toyota Celica Clock Spring
 2005 Toyota Celica Crankshaft Position Sensor
 2005 Toyota Celica Dimmer Switch
 2005 Toyota Celica Door Jamb Switch
 2005 Toyota Celica Mirror Switch
 2005 Toyota Celica Transmitter
 2005 Toyota Celica Turn Signal Flasher