×
ToyotaParts- Hello
- Login or Register
- Quick Links
- Live Chat
- Track Order
- Parts Availability
- RMA
- Help Center
- Contact Us
- Shop for
- Toyota Parts
- Scion Parts
My Garage
My Account
Cart
P/S Pump & Hoses
2003 Toyota Corolla Power Steering Pump, Power Steering Hose, Power Steering Cooler
Currently shopping for
2003 Toyota Corolla
Change VehicleVehicle Options
4 Cyl 1.8 L GASVehicle Options
4 Cyl 1.8 L GASCategories Close X
Currently selected
Steering
Other Categories
A/C & Heating
Air & Fuel Delivery
Belts & Cooling
Body & Hardware
Brakes
Charging & Starting
Driveline & Axles
Electrical
Emission Control & Exhaust
Engine
Headlights & Lighting
Interior & Exterior Trim
Maintenance & Lubrication
Suspension
Transmission
How to use OE catalog
2 diagrams found for the vehicle you selected.Select your vehicle options to narrow down results.
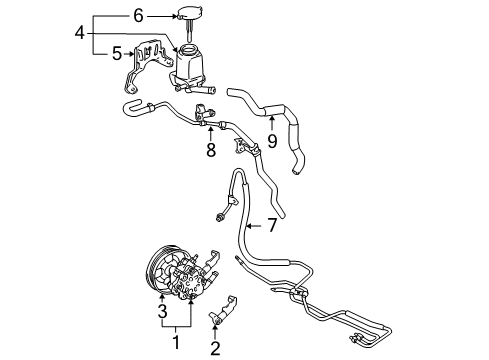
- 1.P/s pump & hoses - P/s pump & hoses
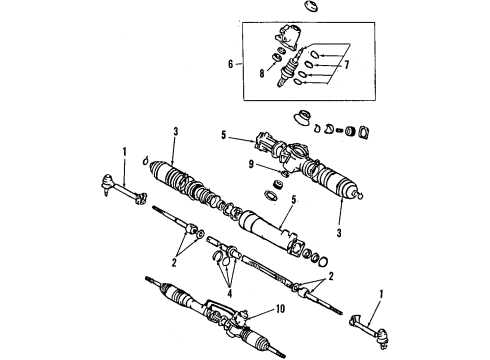
- 2.Steering gear & linkage - Pump & hoses
Sort by:
Ref No.
Ref No.
Part No. & Part Description
Price & Qty.
Part No. &
Part Description
Part Description
- 1

 MSRP: $92.96 Your Price: $66.231
 - 1
 MSRP: $92.96 Your Price: $66.231
- 1

 MSRP: $511.30 Your Price: $348.891
- 2
 MSRP: $18.11 Your Price: $13.011
- 3
 MSRP: $213.72 Your Price: $150.981
- 3

 MSRP: $27.76 Your Price: $19.941
- 4

- 4
 MSRP: $222.21 Your Price: $156.971
- 5
 MSRP: $516.69 Your Price: $352.571
- 5
 MSRP: $50.57 Your Price: $36.331
- 6
 MSRP: $516.03 Your Price: $352.121
- 6


 MSRP: $59.03 Your Price: $42.411
- 7
 MSRP: $1107.06 Your Price: $755.411
- 7

 MSRP: $489.68 Your Price: $342.961
- 8


 MSRP: $206.07 Your Price: $145.571
- 8
 MSRP: $173.43 Your Price: $122.511
- 9

 MSRP: $18.27 Your Price: $13.13
- 9


 MSRP: $145.36 Your Price: $103.561
- 10
 MSRP: $929.20 Your Price: $634.051

 MSRP: $37.58 Your Price: $27.001
 44345-06030
Plate, Vane Pump- Part Notes: L=11.996
- Production Date: 04/2002-05/2004
- Fitting Vehicle Options: ZZE130.. JPP
- Require Quantity: 10
- Package Quantity: 1
- Part Name Code: 44345B
MSRP: $7.67 Your Price: $5.51
 44360-12100
Reservoir Assy, Vane Pump Oil- Production Date: 04/2002-05/2004
- Fitting Vehicle Options: ZZE130.. JPP
- Part Name Code: 44360
MSRP: $222.55 Your Price: $157.20
 44348-12091
Hose, Oil Reservoir To Pump, NO.1- Production Date: 01/2003-05/2004
- Fitting Vehicle Options: ZZE130.. JPP.. 4FC.. USA; ZZE130.. JPP.. 5F; ZZE130.. JPP.. CND
- Part Name Code: 44348A
MSRP: $151.52 Your Price: $107.94
 44345-06020
Plate, Vane Pump- Part Notes: L=11.998
- Production Date: 04/2002-05/2004
- Fitting Vehicle Options: ZZE130.. JPP
- Require Quantity: 10
- Package Quantity: 1
- Part Name Code: 44345B
MSRP: $7.67 Your Price: $5.51
 44313-06060
Rotor, Vane Pump- Part Notes: MARK 0
- Production Date: 04/2002-05/2004
- Fitting Vehicle Options: ZZE130.. JPP
- Part Name Code: 44313
MSRP: $126.48 Your Price: $90.11
- 44313-06090
Rotor, Vane Pump- Part Notes: MARK 3
- Production Date: 04/2002-05/2004
- Fitting Vehicle Options: ZZE130.. JPP
- Part Name Code: 44313
MSRP: $126.48 Your Price: $90.11
- 44345-06040
Plate, Vane Pump- Part Notes: L=11.994
- Production Date: 04/2002-05/2004
- Fitting Vehicle Options: ZZE130.. JPP
- Require Quantity: 10
- Package Quantity: 1
- Part Name Code: 44345B
MSRP: $7.67 Your Price: $5.51

 04446-02070
Gasket Kit, Power Steering Pump- Production Date: 04/2002-05/2004
- Fitting Vehicle Options: ZZE130.. JPP
- Part Name Code: 04446
- Replaced By: 04446-02140
MSRP: $37.58 Your Price: $27.00
 44305-28030
Cap Sub-Assy, Vane Pump Oil Reservoir- Production Date: 04/2002-05/2004
- Fitting Vehicle Options: ZZE130.. JPP
- Part Name Code: 44305
- Replaced By: 44305-06050
MSRP: $41.57 Your Price: $29.86
OEM 2003 Toyota Corolla Parts for P/S Pump & Hoses
Genuine 2003 Toyota Corolla parts are produced by Toyota with the official design and standards, thus they ensure a high quality throughout the production process. OEM parts are the ideal choice for people looking for new P/S Pump & Hoses parts. With our competitive prices, we offer 2003 Toyota Corolla Power Steering Pump, Power Steering Hose, Power Steering Cooler that fit tight budgets, while still including the manufacturer warranties, a hassle-free returns policy and quick shipping options.
Power Steering Pump Installation and Repair Tips for 2003 Toyota Corolla
- Q: How to overhaul the power steering pump on 2003 Toyota Corolla?A: To service the power steering pump, set aside the front wheel, de-fluid it and disassemble parts such as fan and oil reservoir hose. De-assemble the vane pump, check parts and replace damaged parts. Install new seals and reassemble with proper torque requirements and refill the system with the power steering fluid.