×
ToyotaParts- Hello
- Login or Register
- Quick Links
- Live Chat
- Track Order
- Parts Availability
- RMA
- Help Center
- Contact Us
- Shop for
- Toyota Parts
- Scion Parts
My Garage
My Account
Cart
OEM 2003 Toyota 4Runner Fuel Tank
Gas Tank- Select Vehicle by Model
- Select Vehicle by VIN
Select Vehicle by Model
orMake
Model
Year
Select Vehicle by VIN
For the most accurate results, select vehicle by your VIN (Vehicle Identification Number).
1 Fuel Tank found


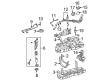
2003 Toyota 4Runner Tank Assembly, Fuel
Part Number: 77001-3D510$1063.82 MSRP: $1559.05You Save: $495.23 (32%)Ships in 1-3 Business DaysProduct Specifications- Other Name: Tank Sub-Assembly, Fuel; Fuel Tank
- Part Name Code: 77100
- Item Weight: 28.40 Pounds
- Item Dimensions: 37.4 x 31.9 x 11.9 inches
- Condition: New
- Fitment Type: Direct Replacement
- SKU: 77001-3D510
- Warranty: This genuine part is guaranteed by Toyota's factory warranty.
2003 Toyota 4Runner Fuel Tank
Looking for affordable OEM 2003 Toyota 4Runner Fuel Tank? Explore our comprehensive catalogue of genuine 2003 Toyota 4Runner Fuel Tank. All our parts are covered by the manufacturer's warranty. Plus, our straightforward return policy and speedy delivery service ensure an unparalleled shopping experience. We look forward to your visit!
2003 Toyota 4Runner Fuel Tank Parts Q&A
- Q: How to service and repair the fuel tank assembly on 2003 Toyota 4Runner?A: The first step to work on the fuel tank assembly requires preventing gasoline from leaking. The center floor hole cover removal starts with holding the rear No. 1 seat assemblies on both sides while removing the tear-off floor mat and unscrewing the 3 screws in addition to disconnecting the 2 connectors. Service work on the fuel tank assembly starts by detaching the fuel tank-to-filler-pipe hose from the fuel filler pipe before draining all fuel content. The mission jack needs to be placed under the fuel tank protector to support it before removing the six securing bolts. Pinch the tabs holding the retainer claws to release the lock and pull out the tubes starting from the main fuel tank line followed by the return line while checking that no dirt can be found at the quick connector locations. Disable the fuel tank breather tube by pinching and pulling out its retainer tab while separating the fuel tank vent hose by deep insertion of its connector followed by pinching a specific area before removal. A mission jack will provide support for the fuel tank assembly to release it from its position through the removal of both bolts and fuel tank bands. To proceed with removal, detach the main and return tubes while removing the joint clips before carefully pulling them out. The process requires complete cleaning of the quick connector areas. Loosen the retainer of the fuel suction tube assembly with Special Service Tool: 09808-14020 (09808-01410, 09808-01420, 09808-01430) before pulling out the assembly along with its gasket. Proceed with reinstalling the fuel tank breather tube through a tab pinch motion followed by tube removal and separation of the fuel tank-to-filler pipe hose. Connect the new filler hose while inserting the breather tube connector into the pipe until it clicks without any damage or foreign objects. Using the Special Service Tool secure the retainer around the fuel suction tube assembly which now holds a new gasket as its proper placement in the keyway enables installation. Install the 3 new fuel tank cushions while you use joint clips to connect the fuel tank main tube with the return tube. A mission jack should assist the fuel tank reinstallation followed by tightening 2 bolts through the tank assembly and connecting 2 fuel tank bands to a torque of 40 N.m (408 kgf.cm, 30 ft.lbf). Securely install the fuel tank tube components by making them lock into position. The fuel tank protector can now be installed with 6 bolts tightened at 20 N.m (204 kgf.cm, 15 ft.lbf) whereby the fuel tank can be connected to the filler pipe hose after checking for any leaking condition.
Related 2003 Toyota 4Runner Parts
 2003 Toyota 4Runner Fuel Pump
 2003 Toyota 4Runner Fuel Filter
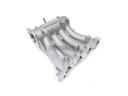 2003 Toyota 4Runner Intake Manifold
 2003 Toyota 4Runner Air Duct
 2003 Toyota 4Runner Fuel Filler Hose
 2003 Toyota 4Runner Fuel Filler Neck
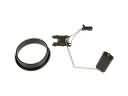 2003 Toyota 4Runner Fuel Level Sensor
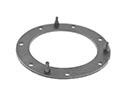 2003 Toyota 4Runner Fuel Pump Gasket
 2003 Toyota 4Runner Fuel Pump Seal
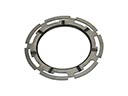 2003 Toyota 4Runner Fuel Tank Lock Ring
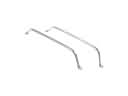 2003 Toyota 4Runner Fuel Tank Strap
 2003 Toyota 4Runner Intake Manifold Gasket