×
ToyotaParts- Hello
- Login or Register
- Quick Links
- Live Chat
- Track Order
- Parts Availability
- RMA
- Help Center
- Contact Us
- Shop for
- Toyota Parts
- Scion Parts
My Garage
My Account
Cart
Gate & Hardware
2009 Scion tC Lift Support, Liftgate Lift Support
Currently shopping for
2009 Scion tC
Change VehicleVehicle Options
Base; 4 Cyl 2.4 L GASVehicle Options
Base; 4 Cyl 2.4 L GASCategories Close X
Currently selected
Body & Hardware
- Bumper & Components - Front
- Bumper & Components - Rear
- Center Console
- Cluster & Switches
- Cowl
- Dash Panel Components
- Door
- Door & Components
- Ducts
- Fender & Components
- Floor & Rails
- Front Seat Components
- Fuel Door
- Gate & Hardware
- Glass - Door
- Glass - Lift Gate
- Glass - Windshield
- Glass & Hardware - Quarter Panel
- Glove Box
- Grille & Components
- Hinge Pillar
- Hood & Components
- Information Labels
- Inner Structure - Quarter Panel
- Instrument Panel
- Lift Gate
- Lock & Hardware
- Outside Mirrors
- Quarter Panel & Components
- Radiator Support
- Rear Body
- Rear Floor & Rails
- Rear Seat Components
- Rear Spoiler
- Reveal Moldings
- Rocker Panel
- Roof & Components
- Seat Belt
- Sound System
- Structural Components & Rails
- Sunroof
- Wiper & Washer Components
Other Categories
A/C & Heating
Air & Fuel Delivery
Belts & Cooling
Brakes
Charging & Starting
Driveline & Axles
Electrical
Emission Control & Exhaust
Engine
Headlights & Lighting
Interior & Exterior Trim
Maintenance & Lubrication
Steering
Suspension
Transmission

Categories Close X
How to use OE catalog
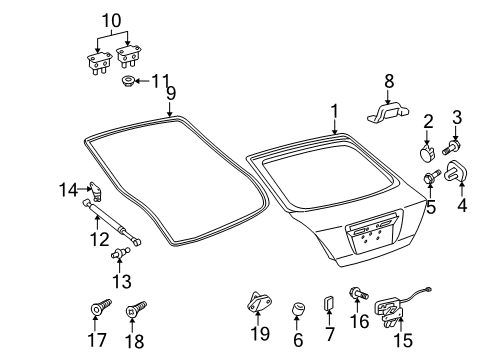
Diagram (1 of 1): Lift gate - Gate & hardware
Sort by:
Ref No.
Ref No.
Part No. & Part Description
Price & Qty.
Part No. &
Part Description
Part Description
- 1
 MSRP: $1157.18 Your Price: $789.611
- 2


 MSRP: $32.25 Your Price: $23.171
- 3

 MSRP: $2.31 Your Price: $1.661
- 4

 MSRP: $14.12 Your Price: $10.151
- 5

 MSRP: $1.65 Your Price: $1.181
- 6

 MSRP: $2.81 Your Price: $2.021
- 7

 MSRP: $9.30 Your Price: $6.681
- 8
 MSRP: $79.66 Your Price: $57.231
- 9
 MSRP: $291.57 Your Price: $204.211
- 10
 MSRP: $54.53 Your Price: $39.181
- 11

 MSRP: $3.14 Your Price: $2.261
- 12

 MSRP: $65.52 Your Price: $47.071
 - 12
 MSRP: $65.52 Your Price: $47.071
- 13
 MSRP: $9.46 Your Price: $6.801
- 14
 MSRP: $13.62 Your Price: $9.791
 - 14MSRP: $14.12 Your Price: $10.151
- 15


 MSRP: $329.83 Your Price: $231.011
- 16
 MSRP: $1.81 Your Price: $1.301
- 17
 MSRP: $1.98 Your Price: $1.421
- 18
 MSRP: $2.64 Your Price: $1.901
- 19

 MSRP: $38.74 Your Price: $27.831

 68961-20051
Bolt, Back Door Stay- Production Date: from 05/2004
- Fitting Vehicle Options: ANT10
- Require Quantity: 2
- Package Quantity: 1
- Part Name Code: 68961
- Replaced By: 68961-02040
MSRP: $9.46 Your Price: $6.80


 MSRP: $2.81 Your Price: $2.02

 MSRP: $1.65 Your Price: $1.18

 MSRP: $2.98 Your Price: $2.14

 MSRP: $1.98 Your Price: $1.42
 MSRP: $3.14 Your Price: $2.26
 MSRP: $2.15 Your Price: $1.54
OEM 2009 Scion tC Parts for Gate & Hardware
Genuine 2009 Scion tC parts are produced by Scion with the official design and standards, thus they ensure a high quality throughout the production process. OEM parts are the ideal choice for people looking for new Gate & Hardware parts. With our competitive prices, we offer 2009 Scion tC Lift Support, Liftgate Lift Support that fit tight budgets, while still including the manufacturer warranties, a hassle-free returns policy and quick shipping options.
Liftgate Lift Support Installation and Repair Tips for 2009 Scion tC
- Q: How to dispose of the liftgate lift support assembly LH safely on 2009 Scion tC?A: In order to remove LH back door stay assembly, hold it in a vise with the piston rod in place. Use metal saw to cut between points A and B in order to release the harmless, colorless gas. Wear safety spectacles and wrap around the cutting zone to avoid the possibility of metal fragments blowing out. Repeat for the RH side.