×
ToyotaParts- Hello
- Login or Register
- Quick Links
- Live Chat
- Track Order
- Parts Availability
- RMA
- Help Center
- Contact Us
- Shop for
- Toyota Parts
- Scion Parts
My Garage
My Account
Cart
OEM Toyota Starlet Alternator
Generator- Select Vehicle by Model
- Select Vehicle by VIN
Select Vehicle by Model
orMake
Model
Year
Select Vehicle by VIN
For the most accurate results, select vehicle by your VIN (Vehicle Identification Number).
3 Alternators found

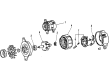
Toyota Starlet Alternator Part Number: 27060-13020
Toyota Starlet Regulator Part Number: 27060-13011
Toyota Starlet Regulator Part Number: 27020-13130
Toyota Starlet Alternator
Choose genuine Alternator that pass strict quality control tests. You can trust the top quality and lasting durability. Shopping for OEM Alternator for your Toyota Starlet? Our website is your one-stop destination. We stock an extensive selection of genuine Toyota Starlet parts. The price is affordable so you can save more. It only takes minutes to browse and find the exact fit. Easily add to cart and check out fast. Our hassle-free return policy will keep you stress-free. We process orders quickly for swift delivery. Your parts will arrive faster, so you can get back on the road sooner.
With Toyota Starlet Alternator units, each spirited drive will be kept lit and charged. The nimble handling, lightness of the Toyota Starlet and unexpected cabin space led to its popularity in city runs and twisty back roads making the ride just as entertaining. The Starlet was made by engineers to remain simple and robust, potentially having compact petrol or diesel engines that are fuel-sipping, but provide brisk acceleration. Buyers liked the fact that Toyota supported the model with robust OEM components, rugged safety modifications and flexible manual or automatic gearboxes that are accommodating to new motorists and enthusiasts. The interior is humanized with supportive seats and clear gauges, the steering is rack and pinion and contributes to the immediate response of the little chassis which makes it reassuring why Toyota enthusiasts continue to hail the model. A bolted-on hot-applied serpentine belt Starlet Alternator turns the crankshaft into electricity and supplies the headlights, stereo, and the battery without leaving any strain on the belt. An integrated voltage regulator stabilizes the output to ensure sensitive electronics get a steady-state of current and windings applied are durable to avoid overheating due to extensive commuting. During the upgrade of a Toyota owner to a high-quality Starlet Alternator, they secure onboard systems and circumvent dark lights or difficulties with starting. It is easy to install, disconnect the battery, unscrew the belt, undo the old unit, place the new Alternator where it belongs, screw hardware, reattach the belt, and reconnect the battery and ensure the Alternator produces adequate charge.
Related Toyota Starlet Parts
 Toyota Starlet Alternator Bearing
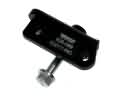 Toyota Starlet Alternator Bracket
 Toyota Starlet Alternator Brush
 Toyota Starlet Alternator Pulley
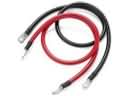 Toyota Starlet Battery Cable
 Toyota Starlet Car Battery
 Toyota Starlet Starter
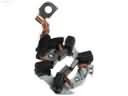 Toyota Starlet Starter Brush
 Toyota Starlet Starter Drive Gear
 Toyota Starlet Starter Solenoid
 Toyota Starlet Voltage Regulator